Schedule start/end of experiment
Table of contents
In short
You can set the start and end time of your experiment with just a few clicks so that it starts or ends at the exact time you want. This is handy if you want to activate or stop it at the start or end of a campaign, for example.
Open Experiment Scheduler
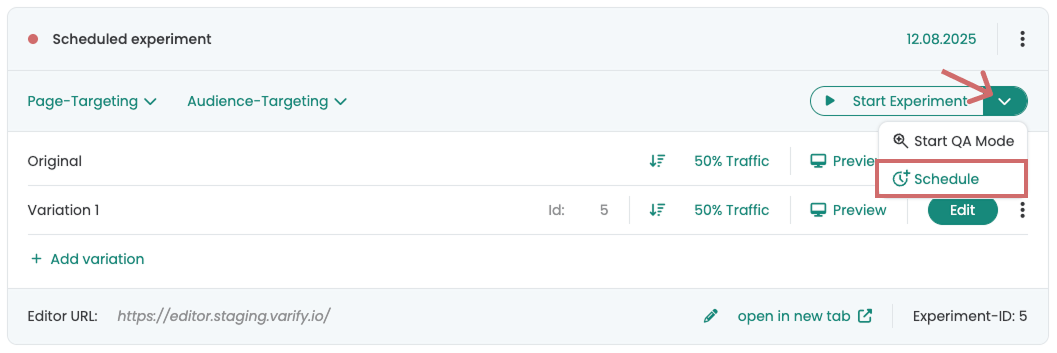
To set the start or end time for an experiment you have created, click on the arrow next to the "Start experiment" button. Under "Schedule" you will find the scheduler with which you can schedule the experiment.
Set start / end times
Depending on what you want to set, you can activate the desired start or end time using the Start Time and End Time switches. Then enter the exact date and time. You decide whether you only want to set a start or end time or both.
- The end time must always be after the start time.
- If the start time is in the past, the experiment starts immediately as soon as you save the schedule.
Save your settings via "Save".
If you set a start time, the "Start Experiment" button then displays "Scheduled start" - or "Scheduled resume" if you want to continue an experiment.
If you only set an end time, you still have to start the experiment manually. As soon as it is running, you will see "Scheduled stop" as an indication that the end is planned.
Adjust, delete or cancel schedule
As long as the experiment has not yet been started - whether manually or via the schedule - you can adjust the schedule at any time. To do this, open the scheduler via "Schedule" and change the settings.
To deactivate or delete the schedule, you can switch off the switches for Start Time and End Time and then click on "Save". This will remove the schedule and the experiment will only run if you start it manually.
If you have accidentally changed something, the "Reset" button always takes you back to the last saved plan.
If the experiment has already been started, you can stop it via "Scheduled stop".
Scheduling in other time zones
The start and end times always apply to the selected time zone. Your own time zone is preselected by default. You can select a different time zone via the "Time Zone" selection if required.
First steps
Tracking & web analytics integrations
- Tracking with Varify
- Manual Google Tag Manager tracking integration
- Automatic GA4 tracking integration
- Shopify Custom Pixel Integration via Google Tag Manager
- Shopify Tracking
- BigQuery
- PostHog evaluations
- Matomo - Integration via Matomo Tag Manager
- etracker integration
- Piwik Pro Integration
- Consent - Tracking via Consent
- Advanced Settings
Create experiment
Targeting
Reporting & evaluation
- GA4 reporting in Varify.io
- BigQuery
- Segment and filter reports
- Share report
- Audience-based evaluation in GA4
- Segment-based evaluation in GA 4
- PostHog Tracking
- Exporting the experiment results from Varify
- Matomo - Results analysis
- etracker evaluation
- Calculate significance
- User-defined click events
- Evaluate custom events in explorative reports
- GA4 - Cross-Domain Tracking
Visual editor
- Campaign Booster: Arrow Up
- Campaign Booster: Exit Intent Layer
- Campaign Booster: Information Bar
- Campaign Booster: Notification
- Campaign Booster: USP Bar
- Add Link Target
- Browse Mode
- Custom Selector Picker
- Edit Content
- Edit Text
- Move elements
- Hide Element
- Keyword Insertion
- Redirect & Split URL Testing
- Remove Element
- Replace Image
- Responsive Device Switcher
- Style & Layout Changes